Fern spores have a reputation for being fiddly. The truth is gentler: they are easy to sow and almost impossible to hurry. Once you accept that the first few months involve very little action and a great deal of patience, raising ferns from spores becomes one of the most satisfying things you can do on a windowsill — and it costs nothing more than a ripe frond and a clean plastic tub.
A seed arrives with its own packed lunch: stored food, a dormant embryo, a protective coat. A spore is a single cell with none of that. It cannot wait for a convenient moment; it has to land somewhere damp and start working almost immediately, using light and water to build itself into something new.
What follows is a two-stage life. First comes the prothallus — a flat, green, heart-shaped scrap of tissue a few millimetres across, closer to a liverwort than a fern. Only after fertilisation does the familiar leafy plant appear. This matters in practice for two reasons. Moisture must be constant at every stage, because the sperm that fertilise the prothallus swim through a film of water. And spore-grown ferns vary, so named cultivars — crested forms, fancy coloured Athyriums — will not come true from spores. Divide those instead.
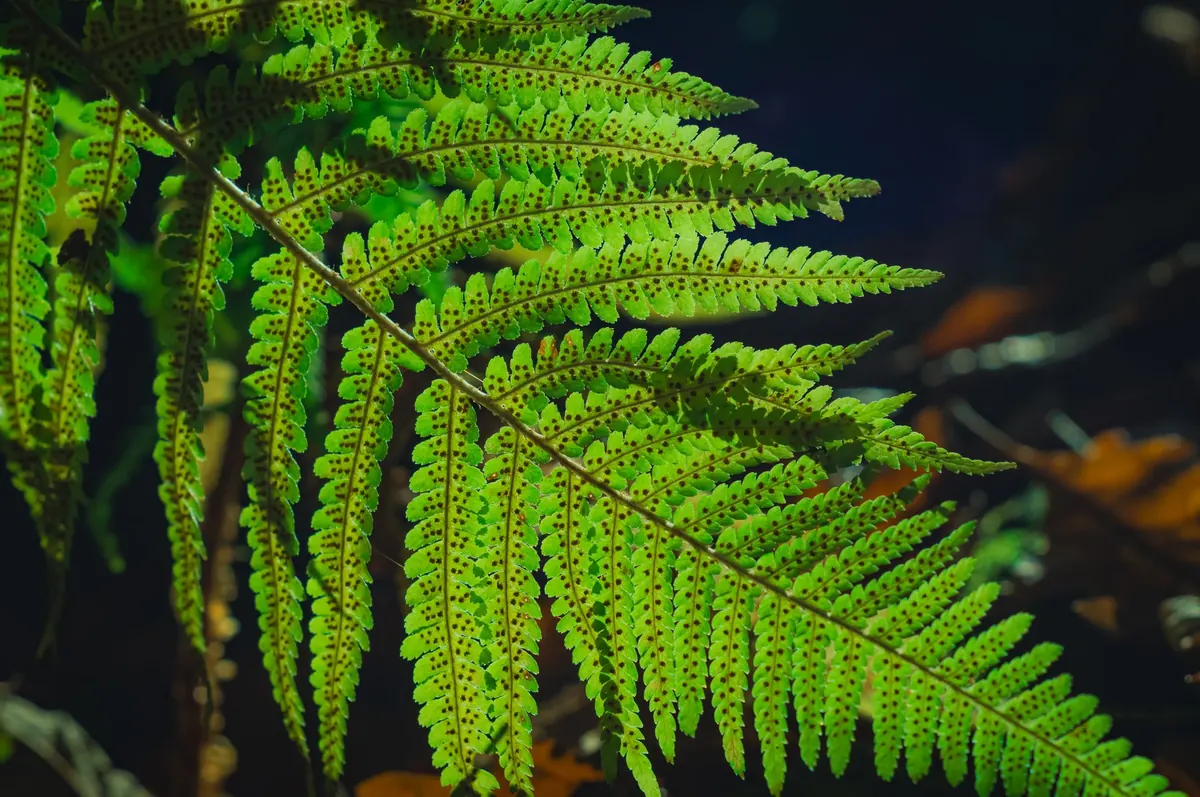
Look at the underside of a mature frond in late summer or early autumn. You are looking for sori: the brown, rust or black clusters that hold the spore cases. On hart's-tongue ferns they run in neat parallel stripes; on polypody they sit as bold round dots; on many Dryopteris species they are kidney-shaped.
Cleanliness does most of the work here. Fill a clear container with a lid — a takeaway tray, a washed margarine tub, a proper propagator — with peat-free compost or coir that has been moistened and sterilised. Pouring boiling water over the compost, letting it cool, then sealing the lid is a simple approach. Rainwater or cooled boiled water is better than hard tap water, especially in chalky areas.
Level and firm the surface, then sow thinly. Tap the paper packet so the spores drift down as a faint dusting. Do not cover them; fern spores germinate best in light. Seal the lid, and write the species and date on a piece of tape on the side. A traditional alternative is to sow onto the damp surface of a piece of brick or a terracotta pot and seal the whole thing in a clear bag.
Keep the container sealed. Condensation on the inside of the lid is exactly what you want; a permanent fog of water droplets is not. If it stays soaked, open the lid for an hour, wipe it, and reseal. Temperature around 18–21°C suits most species — a bright north or east windowsill is ideal. A shelf above a radiator is too hot and dry, and direct summer sun through glass will cook a sealed container in an afternoon.
Top up water only rarely, pouring down the side rather than over the spores, and never let the surface dry out. A few dry hours at this stage can end the whole attempt.
Expect a green sheen across the surface within two to six weeks, though some species take longer and a few benefit from a cool spell first. That film thickens into prothalli — flat, mossy, thumb-nail sized. Sow a crowd rather than a sprinkle, because individual prothalli may produce only male or only female organs, and fertilisation needs neighbours and a film of water.
Then the wait. Small first fronds often appear three to six months after sowing, and slower species can take a year or more. They will look nothing like the parent at first: simple, tiny, sometimes almost moss-like. Keep going. Once the fern's own leaves are unfurling, it is running its own show.
When the little fronds are a few centimetres tall and clearly rooted, lift small clusters with a teaspoon rather than trying to separate individual plants — they resent the disturbance. Pot them into free-draining compost, water them in, and put them back under cover.
Harden them off gradually over a week or two by cracking the lid, then opening it wider, before finally removing it. Keep them out of strong sun and never let the compost dry completely. If you see green fur or slimy algae, that is a sign of too much water and light; lift out the affected patch and ease back on both. Mould on the surface of a sealed container usually means it was not clean enough to begin with.
Choose one forgiving species: hart's-tongue (Asplenium scolopendrium), a native Dryopteris, or common polypody. Collect spores in late summer, sow them within a fortnight, seal the tub, label it, and put it on a north-facing windowsill. Check it once a month, resist the urge to fuss, and start looking properly in spring.
Our damp, mild climate is kind to ferns once they are growing, so the hardest part is simply the first few months of doing nothing. Label everything, keep notes on dates, and sow a second species alongside the first — by the time both are ready to pot on, you will have learnt more from the containers than from any book.
Photo: Lana Kravchenko / Pexels

Compact ferns for pots and narrow, shady courtyards, chosen for spring, summer, autumn and winter interest, with...
Eight planting combinations that carry a damp, shady UK border through the year, pairing ferns with hellebores,...
How to divide overcrowded ferns at the right time of year, with practical steps for lifting, splitting and...

Your guide to growing and identifying ferns.
